In 2019, streaming your TV entertainment has become so popular that it is almost the norm. Systems such as Plex and Kodi create easy to understand, consistent and familiar cross-platform environments in which the whole family can consume media.
IPTV is an extension of such systems adding live broadcast playback and Personal Video Recorder (PVR) functionality. PVR adds the ability to watch, pause and record live TV; be it from aerial, satellite, cable or online sources. Many of these setups will use a local TV tuners plugged into a stand-alone media centre device. But what if you want to provide TV to multiple media centre appliances simultaneously? And what if you want that system to be a virtual TV streaming server instead of a dedicated streaming PC?
This article discusses how to create such a setup.
Why Virtualise?
I have spoken to a number of hardware and software providers in the course of this experiment. One thing that has been consistent has been their response: first laughter, followed by a dismissive “why would you want to do that?”.
Virtualisation is the process of taking what would be considered to be the work of a physical computer. Lifting it up and placing it – along with other workloads – onto another computer. This usually means that a single physical computer (a server) runs multiple, often different operating systems at the same time.
If you want to provide an always-on TV experience to multiple devices, then by definition this requires the TV server to itself always be on. In a non-virtual design, especially in a residential setting a non-virtual TV server may sit idle most of the day, until prime time.
Traditionally – and the way that the industry see it – you would introduce a dedicated TV server device. In an environment where already have an existing always on “24/7 devices – be it an existing server or NAS – virtualisation can allowing you to make use of your existing always-on hardware. Preventing you from having to introduce any new equipment. In essence, while your virtual TV server waits for prime time, the physical computer is doing other, more resource efficient things.
Virtualisation can therefore save you physical space (be it on the floor or in a rack). It can reduce equipment noise, reduce heat and most importantly, save power. It does so by encouraging you to spec correctly; leading to higher financial returns on equipment that you already own. So how do you create a virtual TV Server?
Virtualisation Platform
If you want to create a virtual TV server then, the platform that you choose to use will likely be the one you already have. It is easy to critique a solution and say that “you should be using something else”. Just as DVBLogic, Hauppauge and TBS have said I should use a physical device, I’ll get 50 emails telling me I should have used Proxmox, Unraid or Debian+KVM. I didn’t want to use those. I wanted to use Hyper-V.
Creating a virtual TV server is a lot easier in VMWare ESXi or KVM. Your hardware options are substantially broader due to feature maturity. For Hyper-V users, where Discrete Device Access (DDA) – Hyper-V PCIe pass through – was only introduced in 2016. The robustness of PCI Express pass-through is not yet mature and is cripplingly limiting.
Hyper-V’s issues stem from Microsoft’s design decisions. DDA follows a very robust, standards compliant implementation of the VT-d and PCI Express 3.0 specification. In 2019, most non-data centre/consumer level hardware is not manufactured to support these standards. Complicating it further, WHQL driver validation is not yet strict enough to ensure that drivers are fully compliant; and this is where most DDA related issues occur.
Hyper-V was designed to run Windows as efficiently as possible. This contrasts with their competitors, whose broader interest was to make the most efficient hypervisor platform on the market. DDA’s is a microcosm of Hyper-V’s core design limitations: Microsoft’s stated intention was to allow pass-through of select Graphic cards, GPU accelerators and NVMe controllers, not to create a robust PCIe pass-through solution. This in turn limits TV tuner hardware option.
Choosing TV Tuners
Once you understand your platform, it is important to choose your hardware accordingly.
The first discriminator will be to choose what broadcast standard you require: be it DVB-T, DVB-T2, DVB-S, DVB-S2, DVB-C, DVB-C2 or legacy Analogue.
Equally important will be matching the capabilities of your platform to the hardware device.
VMWare & KVM
VMWare and KVM derivatives offer a broader set of compatible hardware than Hyper-V. KVM is far more forgiving compared to its competitors – especially when running on non-server hardware. The chances of success are also greater if you intend to run a Linux distribution within your Virtual Machine, rather than Windows.
I have have had no luck with Hauppauge products in this regard, however there are some reports of success on-line with TBS. Comparatively, TBS offers a wider range of products, along with open source drivers. While out of reach to most users, this does offer the possibility of the community adding better support for virtualisation as platforms mature.
Reported examples of working hardware include the DVB-S2 TBS 6902 (see the comments and reviews section in the Amazon link). Despite few examples of success, getting a PCIe tuner to work reliably will remain difficult until the Tuner manufacturers migrate onto the PCI3 specification and are compelled (largely by Microsoft) to write compatible drivers.
If you wish to have a higher chance of success, with lower risk however, please follow my suggestions for Hyper-V.
Hyper-V
I was unable to get any PCIe tuner, from any manufacturer to work under Hyper-V Discrete Device Assignment (DDA). Windows VM’s would blue screen as soon as the kernel attempted to load the driver, while Linux VM’s – although stable – could not initialise the hardware device. In one set of tests, I was able to render the Hypervisor’s parent partition unusable for further testing as Hyper-V locked the hardware device and refused to release it.
After a full re-install, the situation was solved, however my testing reveals that Windows Server 2019 has not provided any improvement in using DDA with this type of legacy-bus hardware.
The solution to the problem was ultimately USB 3.0.
It is likely that your server motherboard has USB 3.0 ports on it. It is important to understand immediately that it is not possible for you to use these ports – in most cases. The embedded USB controllers on motherboards cannot usually be released to a VM by the your systems IOMMU gateway. Where they can be, it will be confusing as to which physical ports are in use, leading to difficulties in troubleshooting. Consequently, I suggest that you do not even try.
Using an inexpensive, off-brand PCIe controller from eBay . I was able to achieve a stable PCIe device pass-through with both Linux and Windows VMs under Hyper-V Server 2019. With this in place, it became possible to build a working virtualised TV Server solution.
The Software Design
Running on Hyper-V Server 2019. I installed a trial of DVBLogic’s TV Mosaic 1.0 into a Windows 10 Pro 1809 virtual machine.
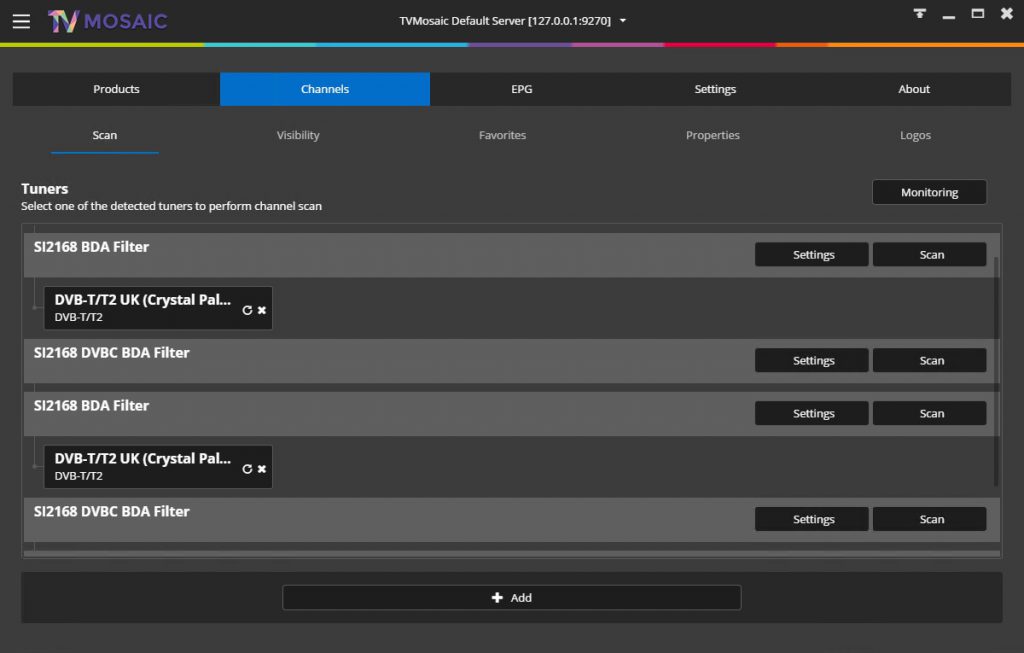
DVBLogic’s trial activation system is not designed to expect to see virtual machines. Over the 3-4 months that I was experimenting, I expired trial activations for both TV Mosaic as well as its predecessor DVBLink. No matter what server, VM or physical location I tried from, I was unable to activate the trial again. If you wish to activate a trial on a VM. You will need to contact DVBLogic until such a time that they fix the issue.
The Hardware Design
Knowing that it would be necessary to replace my existing and PCIe TV Tuners with USB ones meant that I had to re-consider my design. In my original physical setup the HVR-4400 provided access to DVB-S satellite channels, with the TBS-6205 providing DVB-T2 coverage.
At the time, the only USB device that I could find to substitute the satellite tuner was the then new . The DVB-S2 device was well over £100 at the time (it has subsequently reduced considerably) and I was not willing to experiment on such a high cost tuner.
As I intended to use DVBLogic’s TV Mosaic for the project, I chose the DVB-T2 . Asking DVBLogic to support any issues would be easier if it was within their own range.
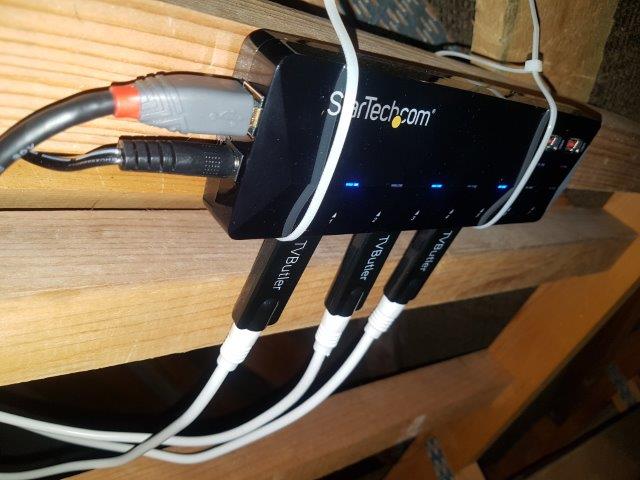
I did not want to run the TV signal down to the server rack, so chose to run the USB from the server to the signal amplifier in the attic. I purchased a good quality 5m USB 3.0 cable and a mid-cost 7 port powered hub. It was necessary to ensure that the hub used a USB type-B upstream connector to allow proper connectivity.
I already had the £12 USB 3.0 controller from a 2015 project. As will be discussed below. It is very important that the USB controller you pick has its own power connector on it. Do not rely solely on PCIe bus power.
The design was to run a single USB 3.0 5Gbps line into the attic to a powered USB 3.0 hub. The TVButler tuner would connect to the hub, and then take a short 2m coax run to the near-by signal amplifier. If the design worked. I would add additional tuners to the hub at a later time; including possibly restoring satellite connectivity.
The Final Specification
- SuperMicro X11SPL-F
- Intel Xeon Silver 4108
- Noctua NH-U12S DX-3647, 120mm cooler for Intel Xeon LGA3647
- Kingston Technology KSM26RD8/16MEI 16 GB DDR4 2666 MHz ECC, CL19, 2RX8
- SuperMicro AOM-TPM-9670V-S Vertical TMP 2.0 Module
- STW USB 3.0 PCIe dual port USB 3.0 5Gbps controller
- StarTech ST93007U2C 7 Port USB 3.0 Powered Hub
- 4x DVBLogic TVButler USB TV Tuners
- LINDY Anthra Line 36744 USB 3.0 Type A to B Cable
Troubleshooting
The follow are the two main issues that I encountered when implementing the Virtual TV Server.
Single Tuner Dropouts: USB Bus Power
It was able to see the TVButler Tuner and it had a strong signal, but it would drop out after a few minutes of playback. The VM had to be rebooted to restore functionality. I removed the hub and extension cable and temporarily ran the signal down to the server rack. The issue persisted.
In my haste to minimise the hypervisors downtime. I had neglected to fit the USB 3.0 controller’s power connector. Despite using a mains powered hub, the solution was unstable. After connecting the power supply, the issue went away completely and in single tuner mode, it was stable.
Multiple Tuner Dropouts: All hubs are not created equally
After purchasing several additional TVButler tuners I setup the hub in the attic. Every 36 hours or so, I would discover that one or more of the Tuners was missing from TV Mosaic. Further investigation revealed that the tuner was missing from Windows device manager. 1 out of every 8 reboots would temporarily fix the problem.
7 out of the 8 restarts, would usually result in the driver for the bottom TV Tuner on the hub failing to load with “error 10”. Additional testing revealed that all of the tuners worked individually, as did the extension cable.
When it did work, HD channels would not play at all and SD channels would artefact as frequently as every 10 seconds.
The clue came from watching the hub while the VM rebooted. As the VM restarted, the ‘device present’ LEDs would flicker. When the reboot worked, the tuners would initialise in descending order and the LEDs remained lit. When it didn’t, the lights would enumerate randomly, flicker and, after a few seconds, the last device on the £24 RSHTECH 7 port powered hub would blink out.
Although mains powered, the flickering suggested that it didn’t have sufficient current to support the load. I swapped in a 2 port StarTech hub from my desk and with 2 tuners present and had no issues. Returning the RSHTECH it to Amazon, I ordered a – at more than double the price.
The ST93007U2C worked perfectly. All of the tuners worked properly and there were no issues at reboot.
Conclusion
As I conclude this article, the system has been in place for nearly 2 months. I have licensed TV Mosaic onto the Windows 10 VM to get around the trial issues, and it has been performing as well as I had hoped.
The Windows VM’s current uptime is 31 days, 8 minutes and at no point during the last two months have I experienced any crashes from the VM or hypervisor. Picture quality is excellent and I have artificially stress tested it to well beyond even its worst case ‘general’ use several times – with all tuners playing back HD channels while TV Mosaic transcodes the streams.
To an Intel Xeon Silver 4108, this worst-case work load is virtually irrelevant.
At idle, the server sits at around 44w, with typical non-TV load pulling 52w. Turning the TV Server VM on or off makes no difference to this figure. When TV is playing-back, this figure may rise by 8-16w. Contrast this with the old physical server, which was drawing 60-80w at all times. As a Windows 10 machine, it couldn’t function as a true server. Consequently, the Xeon Silver server would also be on anyway, taking mean idle load up to around 115w. The 71w saving (115w-44w) equates to an energy cost saving of just under £100-per year.
I spent £210.25 in total on this project, meaning that it will have paid for itself in fractionally over 2 years. If I factor in income from selling the old tuners and physical PC, I will have already broken even. So to DVBLogic, TBS and Hauppauge, all of whom queried with me the sanity of wanting to Virtualise a TV Server. You have your answer.
You can virtualise a TV Server, even on Hyper-V and, if you already have a always on “24/7” virtualisation stack. There is a good reason to do it.