So you’ve accidentally joined someone else’s Plex Home group via an invitation and you just discovered that it deleted all of your managed accounts? This article discusses how to restore your managed users watch history data to their accounts.
This article is based upon a post by SwiftPanda16 on the Plex forums. Credit for the heavy lifting goes to SwiftPanda16.
Oops.
It seems barmy that if you have your own Plex server and connect to another home group, that the administrator of the new home group should become the administrator on your server group and in doing so delete all managed accounts held on your server.
In fairness to Plex, the Plex home invitation email does tell you that it will do this, but if you are in a hurry, this is quite easy to miss.
Please Note: We show that you are already part of a Plex Home. If you accept an invitation to join another Home, you will leave any current Home. If you are the admin of that Plex Home, then it will be deleted, causing other members to leave and any managed users to be deleted.
In my case, unfortunately, we have been trying to troubleshoot the non-functional “Watch together” feature for an hour. We were both frustrated, in a hurry and I was the one who just clicked the button. Thus deleting all of the managed users on my server.
The Red Herring
If you look in “C:\Users\<username>\AppData\Local\Plex Media Server\Plug-in Support\Databases”, you will find a number of database backups, made every 72 hours.
Unfortunately, restoring one of these backups will not bring your users back as these require a combination of file-system and cloud service data to resurrect.
The Fix
It is not perfect, however you can at least get the watch history back for your managed Plex users.
- Remove your account from the Plex home group on the foreign server (or have the server owner remove you).
- Log into your Plex server as the administrator.
- Go to settings, Plex Home and re-create each of your managed users by clicking on the “Crete Managed Account” button. You will need to re-establish permissions and folder access manually.
- Still on the ‘Plex Home’ settings screen, click on one of the new, replacement users.
- Look in the address bar and note down the trailing number in the URL. This is the new user account ID. For example, if the URL for user “John” is:
http://myplexserver:32400/web/index.html#!/settings/plex-home/sharing/552608513
Then the new account ID for “John” is 552608513 - Repeat for each user for whom you wish to reassociate their watch history.
- From the Plex menu switch user and complete the first run for all newly created accounts.
- On the Plex server system, fully exit the Plex server process from the system tray icon and ensure that there are no running Plex service instances in Task Manager.
- Download SQLiteBrowser (the portable version is fine)
- Navigate to “C:\Users\<username>\AppData\Local\Plex Media Server\Plug-in Support\Databases”
- Create a backup of everything in this folder
- Open the file “C:\Users\<username>\AppData\Local\Plex Media Server\Plug-in Support\Databases\com.plexapp.plugins.library.db” in SQLiteBrowser
- Click on the ‘Browse Data’ tab
Note: From this point on, if you make a mistake press the “Revert Changes” button in the toolbar, come back to this step and continue from step 13. - From the ‘Table’ drop-down select the “accounts” table
- Look through the list and locate the value in the ID column that corresponds to the now deleted user and ensure that you have written down the map between the old user account ID and the new one.For example associate that User1’s old ID of 172490073 corresponds to the new ID of 431512814.
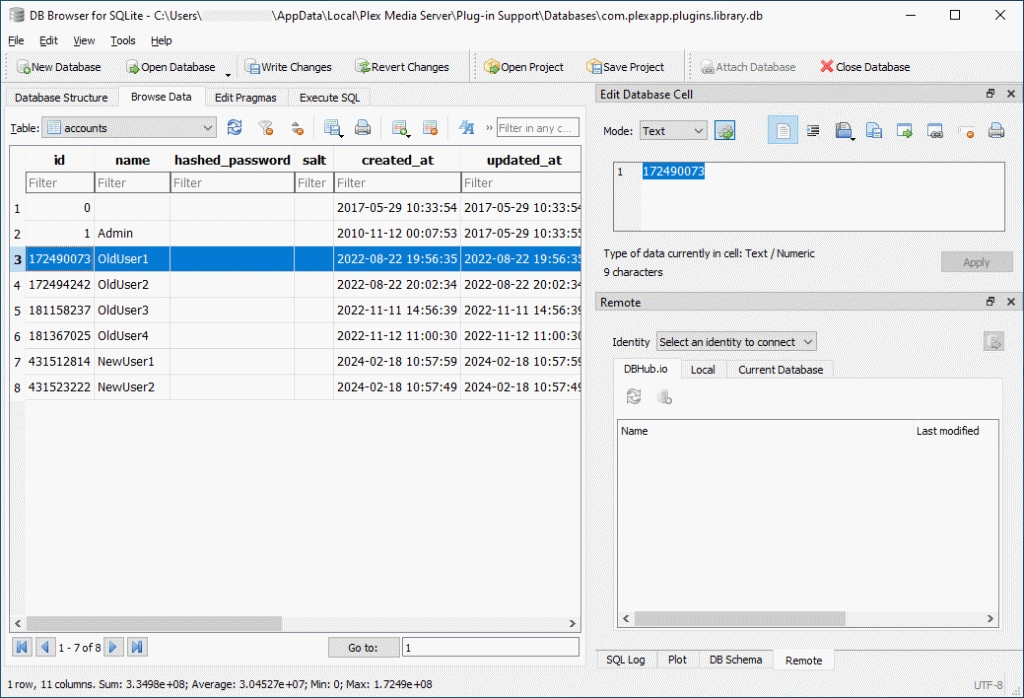
Note: Ensure that you do not change any data values by accident if you copy/paste. - Once you have all of the mappings recorded. In SQLiteBrowser, go the the ‘Execute SQL’ tab
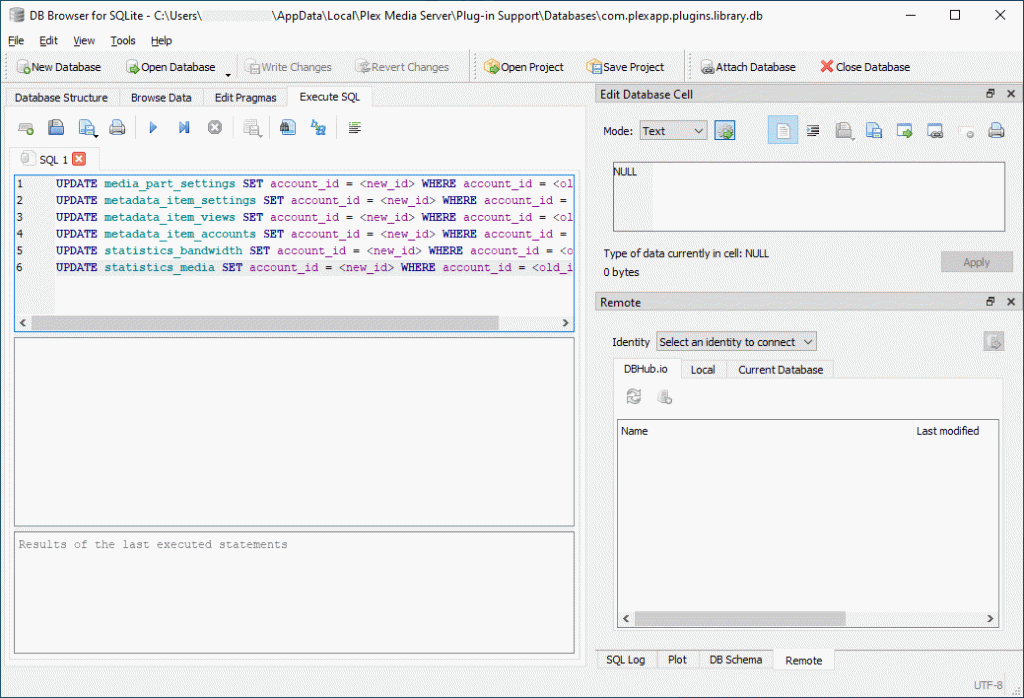
- Paste in the following
UPDATE media_part_settings SET account_id = <new_id> WHERE account_id = <old_id>;
UPDATE metadata_item_settings SET account_id = <new_id> WHERE account_id = <old_id>;
UPDATE metadata_item_views SET account_id = <new_id> WHERE account_id = <old_id>;
UPDATE metadata_item_accounts SET account_id = <new_id> WHERE account_id = <old_id>;
UPDATE statistics_bandwidth SET account_id = <new_id> WHERE account_id = <old_id>;
UPDATE statistics_media SET account_id = <new_id> WHERE account_id = <old_id>;Replacing <new_id> with the new account ID and <old_id> with the old, now dead account ID e.g.
UPDATE media_part_settings SET account_id = 431512814 WHERE account_id = 172490073;
UPDATE metadata_item_settings SET account_id = 431512814 WHERE account_id = 172490073;
UPDATE metadata_item_views SET account_id = 431512814 WHERE account_id = 172490073;
UPDATE metadata_item_accounts SET account_id = 431512814 WHERE account_id = 172490073;
UPDATE statistics_bandwidth SET account_id = 431512814 WHERE account_id = 172490073;
UPDATE statistics_media SET account_id = 431512814 WHERE account_id = 172490073; - Press the Play button in the toolbar to execute the command. Check the output to ensure that it executed correctly, without errors and that some rows were modified. How many rows will be modified depends upon how much usage data exists for that user.
- Repeat steps 17 and 18 for each of the users that you need to re-map.
- Once you have completed re-mapping all of your users, press the “Write Changes” button on the toolbar. This will actually commit the changes to the database.
- Exit SQLiteBrowser.
- Restart the Plex server and log into one of your managed users. Provided that you correctly mapped the old and the new ID’s, their watch history will now be restored.
- If it goes horribly wrong, quit Plex, ensure that there are no running Plex services on the server host and restore the database backup that you made.