Pi-hole is a DNS-based ad and tracking blocker. Originally intended to run on a Raspberry Pi, Pi-hole can itself run officially under almost any Linux distribution. This article discusses the process of installing Pi-hole under CentOS 7 in Hyper-V for Windows Server. By using Hyper-V you can fully virtualise your Pi-hole environment for both scale-up and scale-out deployments.
View: Pi-hole Project Home Page
See Also: Installing Pi-hole in Debian under Hyper-V
System Requirements
Pi-hole’s requirements are extremely modest. The main detail in defining system requirements is the minimum requirement for the Linux distribution that you choose. Unlike other third-party virtualisation platforms, Hyper-V is highly selective over which distributions will work well with its various Microsoft-orchestrated foibles. Consequently, for Windows Server 2016 and 2019 users, CentOS 7 currently offers the best feature support.
Using CentOS 7, a basic Pi-hole installation will require
- 1 CPU core
- 700MB RAM
- 2.5 GB storage space
- A virtual DVD drive
Understand your Pi-hole Design Architecture
The complexity of your existing network and requirements may mean that there are several design decisions that you should make before installing Pi-hole. It is important that you understand these design requirements before implementing Pi-hole, to prevent service disruption.
How should Pi-hole integrate with existing DNS servers?
There are two options for where you place the Pi-hole Server in the DNS lookup chain. Before, or after your internal DNS server.
- Before: Client Device > Pi-hole > DNS Server/Router > Public DNS
- After: Client Device > DNS Server > Pi-hole > Public DNS
Before the DNS Server
Under the ‘Before’ design, if the Pi-hole goes down, the client device can communicate directly with the existing DNS server/router to make DNS lookups. To use this design, all client devices must be re-configured to perform DNS lookups to the Pi-hole. This is either through adjustment of manual DNS Server assignments on all clients, or by using the DNS options on the DHCP server.
The ‘Before’ design is more flexible as it is possible to have some devices bypass Pi-hole completely (e.g. servers).
If you wish to use the ‘Before’ design. The DHCP Server should advertise the Pi-hole as the client DNS Server. The Pi-hole should in-turn specify the router’s DNS address, public DNS (or both) as its DNS address during installation.
After the DNS Server
In the ‘After’ design, it isn’t possible for any traffic to bypass the Pi-hole filtering. All DNS Servers will rely on the Pi-hole Server for resolution. In this design, no reconfiguration is necessary on clients or DHCP Server. The administrator must instead reconfigure the DNS Servers so that the Pi-hole server is their preferred forwarder. The Pi-hole should then only be configures to forward requests to the ISPs DNS Servers or directly to Public DNS.
The ‘After’ design is less flexible, and will be more prone to issues caused by Pi-hole service outages. The advantage is that for secure environments, it is not possible for DNS traffic to bypass filtering.
Redundancy & Failover
If you only have a single Pi-hole server and it fails, what will be the impact to your network? The Pi-hole server could crash, be turned off or even hacked. More likely is the impact of you performing servicing and maintenance on the Pi-hole, creating downtime. Most business deployments should therefore make use of Virtualisation to provide failover and redundancy for the Pi-hole VM. Additionally, most business deployments should have at least 2 Pi-hole servers. Both of which should be made available to service clients using either load balancing or Primary/Secondary DNS Server preferences.
In most ‘Before’ environments (see above), you should continue to advertise the existing, non-Pi-hole DNS Servers to your clients. For example, if your Router’s IP address is 192.168.1.254 and the Pi-hole Server’s is 192.168.1.2, your DHCP Server’s primary DNS option should be 192.16.1.2 (for the Pi-hole) and its secondary should be 192.168.1.254. By advertising a secondary, you give the client a chance to recover (with ads) if the Pi-hole Server fails.
IP Addressing
You must use a static IP / reserved IP address for your Pi-hole installation. Ensure that you know what this address is before commencing the installation and that any intermediate firewalls allow HTTP (TCP 80) and DNS (UDP 53) traffic.
Integration with Active Directory
Under ‘Before’ deployments, an issue may occur for businesses using Directory Services (e.g. Active Directory). The Pi-hole Server will receive an internal request for you company domain e.g. ad.mycompany.co.uk, but will forward this directly to Public DNS. As the AD domain is private, the Public DNS will fail to resolve the request. Within a few minutes of deploying Pi-hole, network clients will become unable to communicate with resources on your business network.
To ensure that there is no DNS route susceptible to this issue, you must ensure that a Conditional forwarder is configured before going-live. You add the conditional forwarder to Pi-hole via Settings > DNS > Conditional Forwarding.
Warning: At the current time, Pi-hole only support a single Conditional Forwarder. This may be a problem in multi-domain Active Directory forests.
Create the Virtual Machine
In Hyper-V Manager, create a new Virtual Machine with the following characteristics:
- Generation 2
- Secure Boot Disabled
- 512 MB startup RAM
- Enable dynamic memory with 256 MB minimum RAM and 1024 MB maximum RAM
- 2 virtual processors
- A virtual hard drive – I suggest leaving the defaults, but I would suggest having 10 GB minimum size
- A virtual DVD drive
- Mount the CentOS 7 installer ISO into the virtual DVD Drive
- A virtual network adapter, connected to your client facing LAN
- Automatic start action: Always start this virtual machine automatically
Installing CentOS
Download the ~950MB Minimal CentOS ISO from the CentOS website. Using the Minimal install ensures that as little RAM and disk space as possible will be used for your Pi-hole environment. A consequence of this is that you will not have a X11 GUI to work with. If this is something that you find off-putting, be reassured that there is not much that you need to do on the Linux command line to get Pi-hole up and running.
Download: CentOS 7
Boot the Hyper-V virtual machine and from the DVD boot menu, choose to Install CentOS
Ensure that you
- Select your correct region, time zone and keyboard layout
- Configure your Virtual Machines network adapter to use a static IP address e.g. ‘192.168.1.2’ with a ’24’ mask and a gateway of ‘192.168.1.254’
- Ensure that you set the correct up-stream DNS servers for your system, this could be your internal DNS servers, your router or a public DNS service such as Google DNS on ‘8.8.8.8, 8.8.4.4’ (note the comma)
- If you are on a business network, set the DNS search alias to match your network domain name e.g. ad.mycompany.co.uk
- Once ready, begin the CentOS 7 installation. While it is installing, ensure that you set a new ‘root’ password. You do not need to add any additional user accounts to the CentOS install to use Pi-hole
Complete CentOS Configuration
Once the installation has finished, you will be presented with the white on black CentOS logon screen. There are a small number of pre-configuration steps to perform before you can install Pi-hole.
Note: Your Virtual Machine will need access to the Internet from this point forward.
- Log-in as ‘root’ (lower case), using the password you entered during setup
- Type the following command, confirming that you accept the installation of the new application. Please note that ALL Linux command line commands are case sensitive:
yum install nano - Once nano is installed, execute the command:
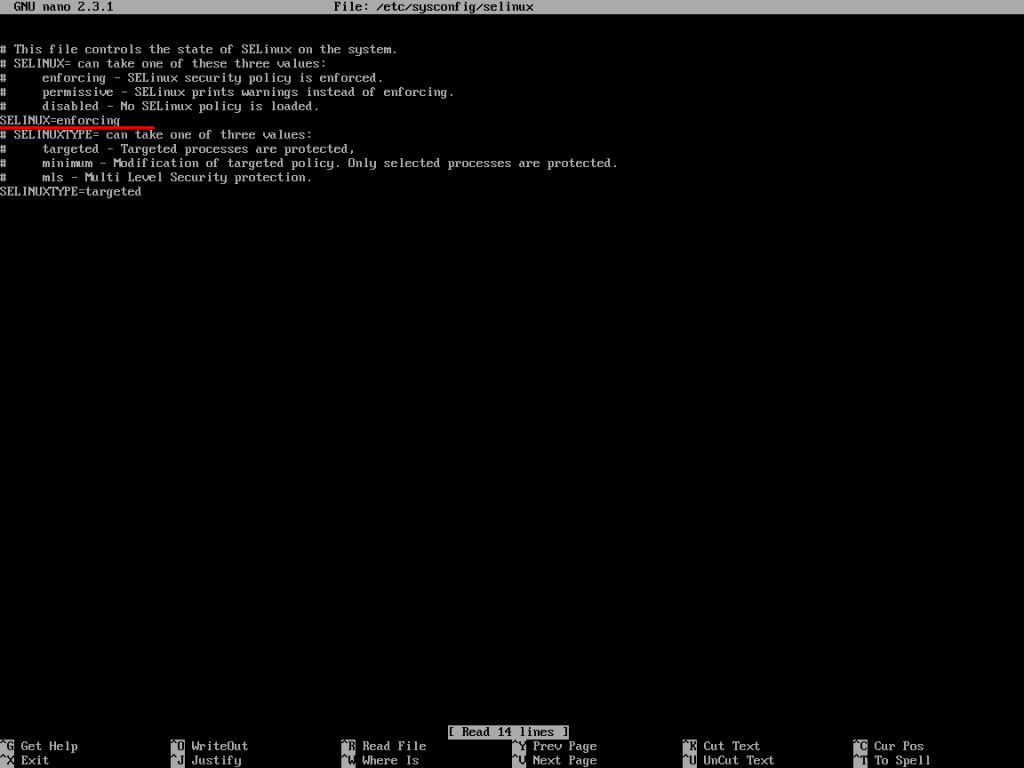
nano /etc/sysconfig/selinux - Nano will load the ‘selinux’ configuration file. Use the cursor keys, delete/backspace, locate the line
SELINUX=enforcing - Edit the “SELINUX=enforcing’ line to read:
SELINUX=permissive
Note: This is case sensitive.
By changing the SELINUX configuration value, you will lower the system security level to permit Pi-hole to run. Pi-hole cannot load unless this step has been performed.
- To save the file and exit Nano, enter the following commands on the keyboard:
Ctrl + O(to save the file)
PressEnter(to accept the file name and complete the save)
Ctrl + X(to exit Nano) - You must now reboot the Virtual Machine. Do this by entering the following command:
shutdown -r now
Installing Pi-hole
Once CentOS is configured, you can install Pi-hole.
- Once the Virtual Machine has rebooted, log in once again as ‘root’
- Enter the following command to download the Pi-hole installer and begin setup:
curl -sSL https://install.pi-hole.net | bash - Follow through the wizard, choosing options suitable for your environment. There are no special configuration steps required for running Pi-hole specifically under Hyper-V
- If you wish to use your ISP’s public DNS servers, or your own organisation public DNS servers, ensure that you scroll down in the installer wizard and select ‘custom’ for the Upstream DNS server configuration
- You can take a note of the randomly-generated admin account password, however I recommend following the steps in the Post-install Tasks section to change the password immediately
Post-install Tasks
Before you start to use Pi-hole, you should perform some basic configuration tasks.
- Change the randomly assigned Pi-hole admin account password to something more memorable. From the command line enter:
pihole -a -p
When you press return, you will be asked to enter a new password - Update and patch CentOS
yum update
Accept any updates that are available to install and allow CentOS to self-update - Once CentOS has finished updating reboot the server a final time by issuing the reboot command:
shutdown -r now - [Optional] Consider enabling HTTPS (TCP 443) support for the Pi-hole admin interface.
View: Enabling HTTPS for your Pi-hole Web Interface
Web Interface Configuration Tasks
After the installation has completed successfully. You can log into your Pi-hole installation from any web browser on any device via:
- http://pi.hole/admin
-or-
- http://<your IP address>/admin
e.g. http://192.168.1.2/admin
[Optional] If you are using Active Directory, or another x.500, DNS bound service. Add a conditional forwarder for your domain:
- Navigate to: Settings > DNS > Conditional Forwarding
- Tick the “Use Conditional Forwarding” check box
- In the “IP of your router” text box, enter the IP address of an authoritative DNS server for your domain
- In the “Local domain name” text box, enter your fully qualified domain name e.g. ad.mycompany.co.uk
Maintenance Tasks
As with any software application, Pi-hole will periodically receive updates. Similarly, so will CentOS. Unfortunately at the time or writing, Pi-hole does not support self-updating via the web interface. Consequently, you should periodically log into the CentOS VM and perform maintenance from the command line. This is a fairly simple process, requiring only two commands
- Update CentOS:
yum update - Update Pi-hole:
pihole -up
You may also wish to periodically reboot the server after updating by issuing the reboot command:
shutdown -r now
You can also reboot the Pi-hole server via the Settings page on the web interface.