System Requirements:
- Windows Server 2012 R2
- Windows Server 2016
The Problem:
Hyper-V 2012 R2 has a lot of new features that are worthy of note and one of the most appealing features for Virtualisation Administrators is shared nothing migration between hosts via SMB. If you are in an environment that doesn’t have shared storage it’s useful enough in itself because for VM purposes it may have just validated your decision not to get shared storage in the first place. Yet less well documented is the features value for setups where when you do have shared storage as you can use shared nothing migration as a mechanism to live migrate VM’s between clusters that are backed onto shared storage – or more specifically between “Cluster Shared Volumes” (CSV).
The picture on the back of the box of the smiling, happy systems administrator performing a shared nothing administrator makes it look so easy right? This is however an all too common occurrence:
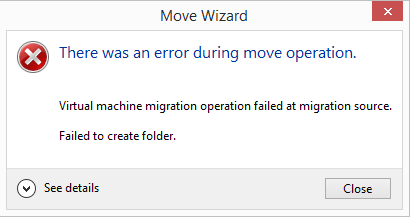
If you look at the specified destination path (e.g. c:\ClusterStorage\Volume1\test) after receiving this error, you will find that it has created the test folder and it will have created a ‘Planned Virtual Machines’ folder beneath it which will in turn contain a folder named with the VM’s VM-SID (the Virtual Machines unique security ID) and a .xml file named with the same VM-SID.
The migration will however not progress any further.
If you attempt to perform the same operation in PowerShell you will receive the PowerShell version of the same error:
Please Note: This document does not specifically address 0x80070005 for Hyper-V Replication Troubleshooting, which is a slightly different (yet related) issue.
More Info
Understanding the topology involved in my setup also reveals my reason for needing to get this working – this is important as setup and reasons yours may differ slightly. What I was attempting to do was migrate between two multi-node Windows Hyper-V Server 2012 R2 clusters while being able to initiate the migration from a third device, a Windows 8.1 management console.
Much of the discussion surrounding 0x80070005 suggests that you simply need to deal with the fact that you need to log onto the source workstation and initiate a push of the VM from the source server to the destination server using CredSSP. This is fine if you have a general purpose commodity server that happens to have Hyper-V on it. In the real world if you have a Hyper-V Cluster, you should not be running it in GUI mode, you should be using Server Core – and if you are using Windows Hyper-V Server to begin with, you don’t even have the option of a GUI.
So we can eliminate the use of the GUI tools or the simplicity of “just RDP into the server” immediately from this discussion. People answering as such are running in very simple Hyper-V setups and in environments with simple, very liberal security policies.
You can of course use PowerShell to perform a CredSSP migration on a Server Core installation and as a mater of good practice the ability to transfer VM’s using CredSSP should be confirmed as working before you start out with Kerberos. To do that, log onto the Source Server and execute the following command in a PowerShell session:
If that doesn’t work, I recommend that you troubleshoot this issue before you look to go any further on the 0x80070005 issue.
Additionally, before make sure that you have done performed the basic troubleshooting steps and also ensure that you are simplifying the problem as much as possible before starting. The following provides an overview of such steps in no particular order:
- Log-in as a Domain Admin to perform this test (if possible). After you have that working migrate down to delegated users and troubleshoot any issues that they are experiencing
- Only try to ‘shared nothing’ migrate a VM that is turned off (create a new VM, attached a default sized dynamically expanding disk, don’t add any networks and leave it off as this means that you will only have 4MB of data to test move). Once you can migrate a VM that is off, attempt to migrate a running VM with a Live Migration.
- Only test migrate between the Source Cluster storage (CSV) owner node and the Destination Cluster storage owner node
- If possible, make the owner of the source and destination cluster core resources the same node that owns the CSV
- Remember that you must use Hyper-V Manager after you have de-clustered the VM from within Failover Cluster Manager before you can perform a shared nothing migration – the fact that your VM has anything to do with a cluster is an aside for Hyper-V. Treat this process as a Hypervisor to Hypervisor move that happens to be on a CSV and forget about the cluster.
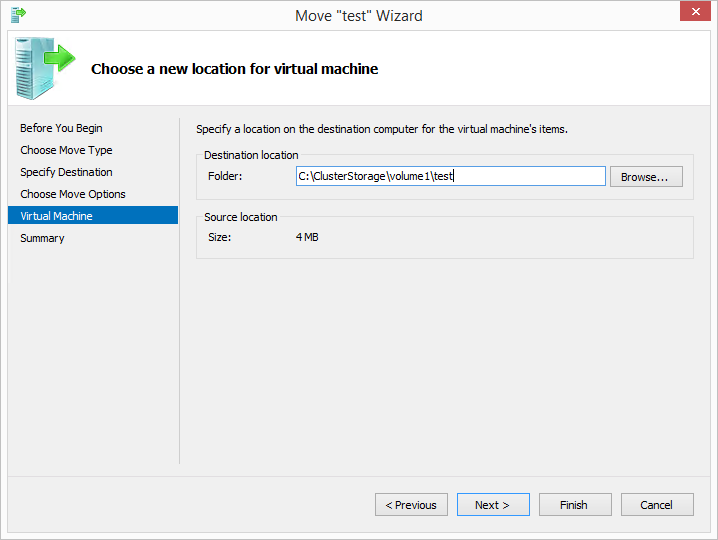
- On the ‘Choose a new location for virtual machine’ page of the migration wizard, remember that you must enter a file system path (e.g. C:\ClusterStorage\volume 1\test) and not a UNC path (e.g. \\server\c$\ClusterStorage\volume 1\test). The migration is going to take place using RPC and not SMB. Thus do not use a UNC path.
- Ensure that you can migrate the VM using CredSSP as discussed at the beginning of this section
- Ensure that your Domain Controllers are running Windows Server 2008 or higher (or at least your logon server), Windows Server 2003 Domain Controllers are known to have issues here (possibly due to lack of AES support). Your domain / forest functional levels can reportedly be Windows Server 2003 if required. I have only tested with Windows Server 2008 domain functional and Windows Server 2008 forest functional levels
- If you are attempting to move between servers in a domain trust, you must ensure that the domain trust supports AES
- Keep your initial testing paths simple and avoid overly complicated NTFS structures. For example, target the destination to be a local sub folder of c:\ and not a junction (such as ClusterStorage\Volume #) or a non-drive letter NTFS Mount Point (i.e. a iSCSI share or drive mount point exposed as a sub-folder to a higher file system). See the links below for more on this.View: Snapshot – General access denied error (0x80070005)
View: Migrating a Virtual Machine problemNote: The iCACLS command listed in the second link does not use the principal of least permission. The command to enact the principal of least permission would be as follows:Finally, keep in mind that for delegation purposes, permissions must be valid for the user account that you are using to perform the move as well as the SYSTEM account.
- Initially, forget about testing the migration into the cluster CSV itself. Instead, create a new folder on the root of the C Drive of the destination server and migrate into this. There are a few suggestions online that you need to put a couple of folder depths between the root of the drive and the VM itself so try something like:
- C:\VM Store\Test\
- If you are following my advice, you will be testing with a 4MB VM called ‘test’ so there won’t be any issue with storage space and the use of the C Drive for testing
- User PowerShell for testing, otherwise you will go insane from having to repeatedly re-enter information in the Move VM wizard. The general gist of the command is:
With the 0x80070005 error, you should find that it will get to 2% and then error after a few seconds.
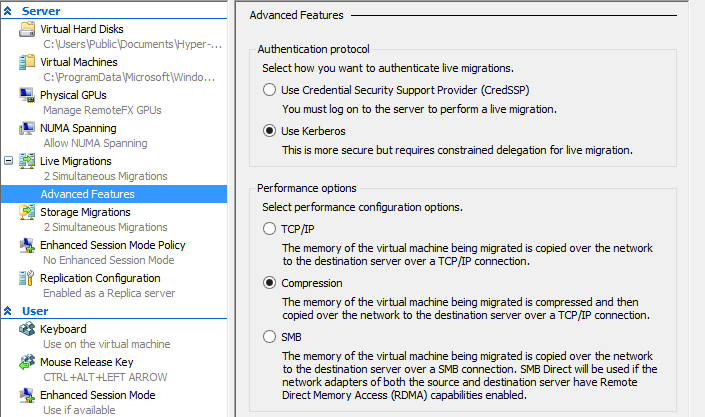
- Ensure that you have enabled Kerberos authenticated Live Migrations in the properties for the Hypervisor in Hyper-V Manager
 Note: You can perform this action in PowerShell using
- Ensure that your Hypervisor’s and the Windows 8.1 management VM are up to date (at the same patch level) and are joined to the same domain
- Ensure that all parties in the process have properly registered DNS records in AD DNS
- Check your Windows Firewall rules – for testing purposes just turn them off if you can (remember to turn them back on afterwards!)
- Check your ASA/Hardware Firewall rules for the same
- Keep an eye on the Hyper-V event logs for any additional information. The log of consequence is found in event Viewer under:Applications and Services Logs > Microsoft > Windows > Hyper-V-VMMS > AdminIf you are experiencing the same problem that I was, you will see three events on the Source Server’s log (20414, 20770 and 21024). The 20770 error is the one being reflected by PowerShell or the Hyper-V Management console. Shortly there-after, the Destination Server will log a 13003 event informing you that the virtual machine from the Source Server (with the same VM-SID) was deleted, indicating that the Destination Server performed a clean-up of the initial migration process.
Permissions
There is a lot of discussion about permissions and 0x80070005 errors. Let us look at the salient points
- The Migration failed at the Source Server
- The Source Server failed the migration because it could not ‘create a folder‘
- We know that the folder in question is the Source Server being unable to create a ‘<VM Name>\Virtual Hard Disks‘ folder
- We know that the Source Server was able to create a ‘<VM Name>\Planned Virtual Machines’ folder because we can see it in the file system if we use the GUI Wizard to perform the migration.
Note: The PowerShell version cleans up after itself! - You have told the Hypervisor to use Kerberos to perform the migration
What does this tell us? It tells us that YOU, the administrator are being told that you cannot create the folder. You are using Kerberos to perform the migration, not CredSSP, so the entire process is being run end-to-end using YOUR credentials. The Management Workstation is logging onto the Source Server as YOU. The Management Workstation is telling the Source Server to initiate the move and in turn the Source Server is delegating your authentication session to the Destination Server and telling it to receive instructions from the Source Server using your credentials. At this point it has nothing to do with ‘NT Virtual Machine’ or VM-SID permissions, this comes after the migration of the core parts of the VM and during initialisation of the VM on the Destination Server. We are not there yet.
So the first thing to check is that your account is authorised to perform the move. If you are a Domain Admin, you should be OK, however you should ensure that the Domain Admin’s security group is a member of the Local Administrators Group on the all participating machines – source server, destination server and management workstation.
If you do not want the user account to have full local admin rights you can add them to the “Hyper-V Administrators” group on each server. To add an account to a local group on Server Core or Windows Hyper-V Server:
Constrained Delegation
When viewing the Delegation tab on the computer account in Active Directory Users & Computers (ADUC) ensure that:
- You are using “Trust this computer for delegation to specified services only” (it doesn’t appear to work if you use the “any service” option)
- You have selected “Use Kerberos only”
- You tick the ‘Expanded’ checkbox to view the full list of entries
- That (once Expanded) there are two entries for each type (types being CIFS and Microsoft Virtual System Migration Service), one entry will have the NetBIOS Name and the other will have the FQDN i.e. there are 4 entries for each delegated host, two with NetBIOS Names and two with FQDN entries.
- When you create the Kerberos Constrained Delegation, you need to ensure that the “Service Name” field column is blank. If there is something listed in the Service Name column, your delegation is not going to work properly.
- You need to have the same number of “CIFS” entries for each host as you do for “Microsoft Virtual System Migration Service”
- It is not necessary to add the Management Workstation to the Constrained Delegation
When you issue the Move-VM command in PowerShell, try substituting the -ComputerName and -DestinationHost values for four combinations of the NetBIOS Name and FQDN.
For example, if your have Server1 and Server1 and your domain is domain.local the combinations to test are:
| Source | Destination |
|---|---|
| Server1 | Server2 |
| Server1.domain.local | Server2 |
| Server1 | Server2.domain.local |
| Server1.domain.local | Server2.domain.local |
If you find that one of these works while the others do not, you have an error in the constrained delegation setup for DNS or NetBIOS aliasing. Carefully recreate the delegation.
After you have setup the delegation, go into a LDAP browser, ADSI Edit or the Attribute Editor in ADUC. For each delegated server, find the servicePrincipalName property and look at the value list. You should have two of each of the following entries (one with the NetBIOS Name and the other with the FQDN).
- Hyper-V Replica Service/
- Microsoft Virtual System Migration Service/
- RestrictedKrbHost/
If you do not see these, you have a Delegation Error and/or an issue in creating SPN records. Either delete and try to recreate them by recreating the delegation or carefully add them by hand.
DNS
Bindings. I know that you checked them, but check them again. Trust me. On Server Core where you have very little contact with the actual server console this is very easy to overlook.
Constrained delegation may work with both NetBIOS and DNS, however Kerberos does not care for NetBIOS. If your DNS doesn’t work, you aren’t going to get a successful ticket session creation that you will need in order to pass credentials forward as part of the Constrained Delegation setup.
Check the following using short hand and FQDN lookups i.e. nslookup server1.domain.local and just nslookup server1. Are they both going where you expect? Crucially, which server NIC is the DNS query going out of and once the reply comes back, which NIC is being used to attempt to contact the host?
- The management console can query all domain controllers in DNS
- The management console can query all Hypervisors in DNS
- The hypervisors can all query the management console in DNS
- The hypervisors can all query all domain controllers in DNS
- The hypervisors can all query each other in DNS
This also requires you to check your default gateway settings.
This is important in the following scenario. Most of you will not encounter this because of the scale of your operations, however the fact is that at Enterprise level I did encounter this problem, hence why I able to write about it.
- Lets assume that you follow best practice and have separate public, management, cluster, iSCSI and heartbeat networks.
- Your management network is data centre local, on a private network with minimal routing and is designated to management of servers, IPC traffic, un-routed VM’s etc in a secure fashion
- Local DNS is available on the management network but does not expose Internet Resolution
- Your public VM address ranges come from the public network and are not exposed via NAT/PAT i.e. routing and firewall’s
- Your domain controllers exist on a public routed network subnet that is separate from the public VM address ranges used for VM’s
- You followed best practice and set your management networks binding order to be the first adapter in the binding order on the hypervisors
- You will now receive 0x80070005 when you attempt to replicate, live migrate of off-line migrate a VM between cluster nodes using Kerberos Constrained Delegation
The problem is the adapter binding order caused by the use of local DNS on a network that offers no connectivity to the domain controllers. When the KDC attempts to generate a Kerberos ticket for the constrained delegation, the lookups for the domain controllers will be performed using the DNS servers on the management network and will mistakenly attempt to connect to the domain controllers via the management network. This is simply going to time out – causing the wait during migration. Once it times out, Windows DNS doesn’t defer to the next set of DNS servers or attempt to get to the DC’s on a different NIC. It simply gives up.
The resulting very helpful error code that Hyper-V offers back is Access Denied while seemingly attempting to create files in the file system – the Hypervisor will log that it was unable to create the ‘Virtual Hard Drives’ folder on the destination Hypervisor. What it should actually say here is that it could not properly initialise the end to end Kerberos Constrained Delegation ticket session due to a timeout. It of course doesn’t do that.
In this situation the fixes are one of:
- Add an interface on the domain controllers on the management LAN
- Add a network interface which can connect to the domain controllers in a higher adapter binding order position in the Hypervisor binding order
- Remove the DNS servers from the management networks TCP/IP properties, thus forcing Windows Server to use the first available DNS server configuration on a lower ordinal adapter
- Allow routing from the management LAN to the domain controllers. Alias, stub or secondary zone the domain controllers in the management networks DNS and hope you remember to keep them up to date when you make changes to Domain Controller DNS records
Assuming that your constrained delegations are correct, it will start working as soon as the DNS updates have propagated.
The Fix
Ultimately the problem that I had was in the setup of the Constrained Delegation and in another case as discussed above, the DNS binding order. For the Constrained Delegation issueI only had NetBIOS values for the ‘Microsoft Virtual System Migration Service’ while I only had FQDN values for CIFS entries which in turn meant that the associated SPN records were missing.
I was originally using a script by Robin CM for this purpose, it appears that it is this script which isn’t quite ticking all of the boxes.
View: Robin CM’s IT Blog – PowerShell: Kerberos Constrained Delegation for Hyper-V Live Migration
In my environment, the following represents a corrected version of the script.
The script assumes that you have placed all of your Hypervisor’s in a dedicated OU. The script will obtain a list of all servers in the OU and automatically create the constrained delegation complete with both pairs of the NetBIOS Name and FQDN records.
In addition, the script also now ensures that the system is not adding a constrained delegation back to itself into the AD database.
You must be a domain admin or have permissions to write to msDS-AllowedToDelegateTo objects in AD in order to run this script.
Once you have run it, give the system a few minutes so that AD can distribute the update to all DC’s and for the Kerberos session on the respective nodes to refresh.
Update for Windows Server 2016
So I decided to reinstall a node to Hyper-V Server 2016 and have a play with it in amongst HyperV Server 2012 R2.
The experience did not go swimmingly well. Here is a quick overview of some issues and I encountered/created myself to keep in mind when troubleshooting this
- The Hyper-V server Win32 installer will perform an in-place upgrade as a clean install. Remember that this means that you will need to delete the AD computer account object and DNS records and then re-join the system to the domain in the correct OU.
- Once you have done this, you will need to re-create the Kerberos Constrained Delegation records for all Hyper-V nodes
- I was experiencing a problem where I could use Kerberos to Live Migrate or offline migrate to the Hyper-V 2016 host, however I could not migrate back unless I logged onto the 2016 node and use CredSSP to move it back again. Looking at the Windows Server 2008 R2 domain controller security logs, Kerberos authentication was failing. In the end the fix was to add a Delegation for CIFS and the ‘Microsoft Virtual Systems Migration’ delegation classes of the computer account object — TO ITSELF. Yes, if you have Computer Accounts HVNode01, HVNode02, HVNode03, the delegation tab for HVNode01 must include CIFS and MVSM entries in DNS and NetBIOS nomenclature for not only HVNode02 and HVNode03 but ALSO HVNode01 (itself). Once I did this, I could magically migrate the VMs back again.
- If you are using Jumbo Frames, remember to perform a test using the following command. If it doesn’t work, fix this before doing anything else
- I made a silly mistake in late night PowerShell command entry when setting up the networking on the 2016 box, I entered
when I actually meant to enter
This hooked up a new Virtual network adapter on the Hypervisor called ‘Management’ to each and every Virtual Switch on the Hypervisor. So I wound up with 3 NIC’s called Management all on different networks. They went off and got their own IP addresses from DHCP, registered themselves in DNS and created chaos in the adapter binding order. Naturally the one on the unrouted Management network wound up at the top of the binding order and things got a little upset!
- The very first randomly selected non-production critical VM that I attempted to migrate was the nodes local console VM. This VM was not designed to move from the node and didn’t have CPU compatibility mode enabled. This caused additional failure issues.
- The second randomly selected non-production critical VM that I attempted to migrate gave no hex error code or message what so ever either through the UI or the event log, just throwing Event ID 24024 and stating that the migration failed and the error message could not be found. To cut a long winded story short, in the end I (correctly) assumed it was the VM itself at fault and decided to Export / Import it in order to lazily cycle the file system permissions. It turns out that when I attempted to re-import the VM (as a restore) the import wizard notified me that it was expecting to find a snapshot file but that the snapshot itself was unavailable (this VM had no snapshot on the UI and no snapshot file in the export snapshots folder). The wizard asked me if it could clear the snapshot remnant and imported the VM. Once it was imported again, it could now live migrate and offline migrate properly. It had nothing to do with the 2016 node.Note: Remember to check on the source Hypervisor for remnants of the original Exported VM which may be left in place on the file system.
With the above issues resolved, everything is working correctly between the Hyper-V Server 2012 R2 nodes and the test Hyper-V Server 2016 node.